• Sign Up! To view all forums and unlock additional cool features

    Welcome to the #1 KIA Stinger Forum and KIA Stinger community dedicated to KIA Stinger owners and enthusiasts. Register for an account, it's free and it's easy, so don't hesitate to join the KIA Stinger Forum today!


Kia Stinger Hatch/Trunk Rattle TSB With New Parts

Messages
71
Likes
41
State
Non-US
Country
Canada
#21
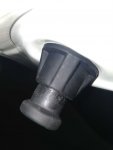
I think I found a solution for the bumpers backing off on heir own... Which someone mentioned and mine have been doing causing the rattle to return.

Get some high quality electrical tape, like 3m supper 33+ and wrap/strech a single layer around the bumpers on the threaded part only. You should see the threads through the tape as it's stretched on. 1 full wrap and tear off no more than half way around overlapping.

Then thread/jam it back in carefully until the edge of the tape, which should be at the end of the last thread, is about flush with the plastic base.

No way in heck is it going to back itself n further now and this should keep it from falling out too.

I'll report back with a verdict, but since this is non destructive and takes 1 minute to do, I suggest others try it as well.
 
Messages
222
Likes
26
State
AZ
Country
United States
#22
Glad someone brought this thread back up, mine still rattles even though the TSB was performed on my car.
 
Messages
71
Likes
41
State
Non-US
Country
Canada
#23
Verdict:

Success.

Rattle free for 2 days and no way in heck are those bump stops going to move in or out on their own.

To reiterate, here is what you do:

1. Take out the bump stops from the hatch
2. Stretch 1.25 to 1.5 wraps of nice soft electrical tape around the threaded part of the bump stops. Line the tape up so the edge of the tape is at the end of the last thread in about the middle of the part.(Tape such as 3M Super 33+. It has to be soft stretchy stuff not that cheap vinyl crap.)
3. You should clearly see the grooves/threads through the tape.
4. Carefully twist the stops back in and they should go in until the tape is not visible/at the edge of the plastic base. It will be rather tight. Don't break/twist it off! If it feels like it may break then you used too much or the wrong kind of tape.
5. The stops should be impervious to self movement now.

Test close the hatch. It should cinch down nicely and be rattle free!
 
Messages
66
Likes
6
State
Non-US
Country
Canada
#24
Genius, will try it this weekend

Verdict:

Success.

Rattle free for 2 days and no way in heck are those bump stops going to move in or out on their own.

To reiterate, here is what you do:

1. Take out the bump stops from the hatch
2. Stretch 1.25 to 1.5 wraps of nice soft electrical tape around the threaded part of the bump stops. Line the tape up so the edge of the tape is at the end of the last thread in about the middle of the part.(Tape such as 3M Super 33+. It has to be soft stretchy stuff not that cheap vinyl crap.)
3. You should clearly see the grooves/threads through the tape.
4. Carefully twist the stops back in and they should go in until the tape is not visible/at the edge of the plastic base. It will be rather tight. Don't break/twist it off! If it feels like it may break then you used too much or the wrong kind of tape.
5. The stops should be impervious to self movement now.

Test close the hatch. It should cinch down nicely and be rattle free!
 
Messages
138
Likes
11
State
MI
Country
United States
#25
Verdict:

Success.

Rattle free for 2 days and no way in heck are those bump stops going to move in or out on their own.

To reiterate, here is what you do:

1. Take out the bump stops from the hatch
2. Stretch 1.25 to 1.5 wraps of nice soft electrical tape around the threaded part of the bump stops. Line the tape up so the edge of the tape is at the end of the last thread in about the middle of the part.(Tape such as 3M Super 33+. It has to be soft stretchy stuff not that cheap vinyl crap.)
3. You should clearly see the grooves/threads through the tape.
4. Carefully twist the stops back in and they should go in until the tape is not visible/at the edge of the plastic base. It will be rather tight. Don't break/twist it off! If it feels like it may break then you used too much or the wrong kind of tape.
5. The stops should be impervious to self movement now.

Test close the hatch. It should cinch down nicely and be rattle free!
Thanks for the idea and testing this for us
 
Messages
104
Likes
9
State
MN
Country
United States
What I Drive
2018 Kia Stinger GT2
#26
Great job [MENTION=633]brandon.mol[/MENTION], sometimes all it takes is a little creativity.[thumb]
 
OP
Kazz

Kazz

500 Posts Achieved
Messages
507
Likes
137
State
IL
Country
United States
What I Drive
2018 Micro Blue Stinger GT2 AWD
Thread Starter #28
Not visible to me.

So, does this solution then have the bumpstops that are on either side of the latch extended to the point that the hatch itself isn't resting on the stops mid-way up the rails towards the hinged top? I'm of the impression the hatch should rest on both sets of stops without rattles.
 
Messages
71
Likes
41
State
Non-US
Country
Canada
#29
Not visible to me.

So, does this solution then have the bumpstops that are on either side of the latch extended to the point that the hatch itself isn't resting on the stops mid-way up the rails towards the hinged top? I'm of the impression the hatch should rest on both sets of stops without rattles.
OK, I uploaded the image rather than hotlink it. Should see it now.

Yes, that's the point. The guides on the side don't support the weight of the hatch, they only guide it laterally and prevent it from moving side to side. The plastic parts on the hatch sit between the rubber guides not on top of them. The rattle sound is the latch metal on metal as the hatch bounces up and down. Tightening up the bump stops reduces or eliminates that movement and is part of the TSB, however they end up creeping back in. My solution with tape, prevents them from creeping back in, thus eliminating the rattle occurrence.
 
OP
Kazz

Kazz

500 Posts Achieved
Messages
507
Likes
137
State
IL
Country
United States
What I Drive
2018 Micro Blue Stinger GT2 AWD
Thread Starter #30
OK, I uploaded the image rather than hotlink it. Should see it now.

Yes, that's the point. The guides on the side don't support the weight of the hatch, they only guide it laterally and prevent it from moving side to side. The plastic parts on the hatch sit between the rubber guides not on top of them. The rattle sound is the latch metal on metal as the hatch bounces up and down. Tightening up the bump stops reduces or eliminates that movement and is part of the TSB, however they end up creeping back in. My solution with tape, prevents them from creeping back in, thus eliminating the rattle occurrence.
All this time I thought it was some delicate balance to keep things from rattling at the "stops" halfway up the side of the hatch. Interesting!
 
Messages
130
Likes
13
State
TN
Country
United States
What I Drive
2018 Kia Stinger GT2
#31
All this time I thought it was some delicate balance to keep things from rattling at the "stops" halfway up the side of the hatch. Interesting!
LOL that's what I've been doing too.
 
Messages
13
Likes
10
State
TX
Country
United States
#33
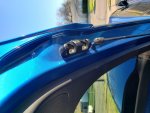
I still had the rattling until I saw another post. The KIA fix was additional washer but it was to thin. Once you add a thicker washer it fixed the issue. So the black pieces on the side once you lift the hatch, unbolt the 2 bolts for each side. Be careful as the washers will fall off. Once they are off and the recall should have been done you will have 2 thin washers. Take one off and then add 1 of the thicker ones and reinstall back on.

20190316_182840.jpg

Screenshot_20190317-231005_Messages.jpg

Screenshot_20190317-231009_Messages.jpg
 

spider55

1000 Posts Achieved
Staff Member
Messages
1,795
Likes
599
City
Coolidge
State
AZ
Country
United States
What I Drive
2019 stinger GT1
#34
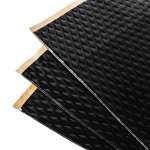
I noticed the bump stops on my car were all the way in, you have to play with them to find out how far to unscrew them so screw them all the way in then turn one in a quarter to one in a half turns out. Unfortunately it is an open trunk an your going to get a lot of noise, get some Sound Deadening Mat and line your trunk with it, that will take care of a lot of the noise and drone from your exhaust. That's my two cents worth.

1523223018281.jpg

81boSD29BqL._SL1500_.jpg
 

MurlinatoR

1000 Posts Achieved
Staff Member
Messages
1,231
Likes
302
State
IA
Country
United States
What I Drive
Lot's of Kia's
#35
I still had the rattling until I saw another post. The KIA fix was additional washer but it was to thin. Once you add a thicker washer it fixed the issue. So the black pieces on the side once you lift the hatch, unbolt the 2 bolts for each side. Be careful as the washers will fall off. Once they are off and the recall should have been done you will have 2 thin washers. Take one off and then add 1 of the thicker ones and reinstall back on.

View attachment 2138

View attachment 2139

View attachment 2140
I did this exact thing with mine about 3 months ago and has been silent since.


Top