ADD W1 V3 Dual Catch Can w/ Custom Bracket Review
Given my upcoming choice of mods (and finally getting my car back 1.5 months later, something that just angers me to talk about, so I'm avoiding the topic), it was time for me to ADD (ha ha ha) some catch cans in preparation. I made the choice of buying the ADD W1 V3 dual catch cans because it came with a custom mounting bracket. I really didn't want to have to fabricate my own mounting setup if I didn't have to.
In case you need a brief background on what a catch can does: it filters out blow-by gases before they're recirculated back into the intake system to be burned up by the engine. In stock situations, this is nary much of a problem especially if the car is relatively new and/or low miles. However, once you start increasing boost, you increase cylinder pressure. Since there are no good aftermarket coils, people are decreasing the gap on spark plugs to compensate/avoid spark blowout. So now you have a slightly less complete combustion process with increased cylinder pressure against the seals = more blowby gases. This is when it's time to add these cans.
The first thing I want to note is that the kit is very well outfitted. Literally everything you need is included from the nuts and bolts for the custom bracket down to hose clamps and pre-trimmed hoses. FWIW, my hoses were trimmed pretty poorly, so I took a razor and cleaned the trimmed edge so that it would mate smoother and flush against the fittings. Also, the bracket inherently holds one can, so you'll re-use the catch can's own bracket for the other side (it won't look symmetrical if you have minor OCD like me).
The install itself is pretty straightforward, so I'll skip that. Instead, there are some notes I'm going to make that may help you:
- The instructions call for teflon tape around the fittings that go into the catch can. If you're like me, the thread seal tape you have is a standard width of 1/2". The thread length on the hose fittings is 1/4". I cut my tape in half lengthwise, but it was a bit cumbersome to do if I'm honest.
- The 9mm fitting on the car looks hard to get to, but the bracket in the way is easily removed by unbolting the single, silver bolt holding it in place. Unbolt the bracket and you have plenty of space to work with.
- My stock intake hoses would not come off by hand. The hoses were not only on tighter than my wildest dreams, but I yanked and gripped them until I was shifting my engine and car a bit trying to yank them off. You might need a hose removal tool. Since I didn't have one, I went the one-way trip of slicing the hose lengthwise across the fitting. Of course, they were so tight that I still had to actually pry the hose off with a flathead like they were glued to the fitting! So, fair warning: these hoses might be more stubborn than you're used to. Come prepared.
- The 9mm hose is very loose on the car's fitting. It seems as if it's a 9mm hose on a 9mm barb (usually, the barb is .25mm to .5mm thicker), and I cannot emphasize enough that you should absolutely attempt to overtighten the hose clamp and visually look for a bulging squeeze. This hose is just way too loose for standard tightening.
- My custom bracket's installed position caused the back catch can to actually rub against the plastic guard rail. You can see the white rub mark where the can was touching. I noticed this early on. I added bonded washers between the bracket and the wheel well so that the bracket was further away and would not rub on the plastic guard rail.
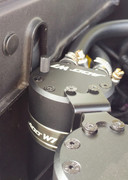
You can see the little white mark where the can just started to rub above where the can used to be.
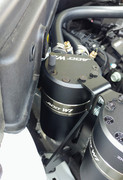
After the bonded washers, there's more "comfort" space so that it won't ever touch.
- Routing the hoses along the front requires a bit of finagling, and if you're like me and want to keep the engine cover, you'll have to play around with the routing a bit to avoid pressing down on the hose near the front driver's side engine cover mount point. Also, the route in the installation instructions had too many tight curves in which hoses were pressed up against or rubbing other edges. I made some slight changes to the positioning so that there was more slack in the hose and so it pressed up against nothing sharp or "edge-like" at all. I do agree with the zip-tying, though: it doesn't touch that pulley, but it comes damned close if you let it hang loose.
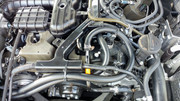
At first glance, it looks like the instructions, but...
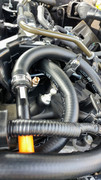
These hoses are routed slightly differently which gives them a little more slack and also no hard rubbing on edges. However, you can see one hose still has a mark and indentation where it rubs the lip from the engine cover that goes over the mount pole just to the left of it.
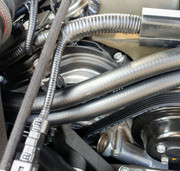
All is not well, though, as the engine cover rubs this other hose and I'll have to figure out what to do about it. You can see the tiny bit of marking as this is still a fresh install. 5000 miles from now and that rub may look very different.
My final verdict? Still a decent product. The price tag is sometimes hard to justify because there is such a thing as a DIY catch can for a fraction of the price, but this kit is a full kit. It's not perfect, and I think some adjustments need to be made, but I'm happy with the final result. I've run it hard a few times, and so far everything is in working order. It looks professional, and is less likely to alarm your dealership than a metal water bottle and some jerry-rigged fittings and poorly thought out hoses. If you want to get a dual catch can setup, this is the one to buy!
Given my upcoming choice of mods (and finally getting my car back 1.5 months later, something that just angers me to talk about, so I'm avoiding the topic), it was time for me to ADD (ha ha ha) some catch cans in preparation. I made the choice of buying the ADD W1 V3 dual catch cans because it came with a custom mounting bracket. I really didn't want to have to fabricate my own mounting setup if I didn't have to.
In case you need a brief background on what a catch can does: it filters out blow-by gases before they're recirculated back into the intake system to be burned up by the engine. In stock situations, this is nary much of a problem especially if the car is relatively new and/or low miles. However, once you start increasing boost, you increase cylinder pressure. Since there are no good aftermarket coils, people are decreasing the gap on spark plugs to compensate/avoid spark blowout. So now you have a slightly less complete combustion process with increased cylinder pressure against the seals = more blowby gases. This is when it's time to add these cans.
The first thing I want to note is that the kit is very well outfitted. Literally everything you need is included from the nuts and bolts for the custom bracket down to hose clamps and pre-trimmed hoses. FWIW, my hoses were trimmed pretty poorly, so I took a razor and cleaned the trimmed edge so that it would mate smoother and flush against the fittings. Also, the bracket inherently holds one can, so you'll re-use the catch can's own bracket for the other side (it won't look symmetrical if you have minor OCD like me).
The install itself is pretty straightforward, so I'll skip that. Instead, there are some notes I'm going to make that may help you:
- The instructions call for teflon tape around the fittings that go into the catch can. If you're like me, the thread seal tape you have is a standard width of 1/2". The thread length on the hose fittings is 1/4". I cut my tape in half lengthwise, but it was a bit cumbersome to do if I'm honest.
- The 9mm fitting on the car looks hard to get to, but the bracket in the way is easily removed by unbolting the single, silver bolt holding it in place. Unbolt the bracket and you have plenty of space to work with.
- My stock intake hoses would not come off by hand. The hoses were not only on tighter than my wildest dreams, but I yanked and gripped them until I was shifting my engine and car a bit trying to yank them off. You might need a hose removal tool. Since I didn't have one, I went the one-way trip of slicing the hose lengthwise across the fitting. Of course, they were so tight that I still had to actually pry the hose off with a flathead like they were glued to the fitting! So, fair warning: these hoses might be more stubborn than you're used to. Come prepared.
- The 9mm hose is very loose on the car's fitting. It seems as if it's a 9mm hose on a 9mm barb (usually, the barb is .25mm to .5mm thicker), and I cannot emphasize enough that you should absolutely attempt to overtighten the hose clamp and visually look for a bulging squeeze. This hose is just way too loose for standard tightening.
- My custom bracket's installed position caused the back catch can to actually rub against the plastic guard rail. You can see the white rub mark where the can was touching. I noticed this early on. I added bonded washers between the bracket and the wheel well so that the bracket was further away and would not rub on the plastic guard rail.

You can see the little white mark where the can just started to rub above where the can used to be.

After the bonded washers, there's more "comfort" space so that it won't ever touch.
- Routing the hoses along the front requires a bit of finagling, and if you're like me and want to keep the engine cover, you'll have to play around with the routing a bit to avoid pressing down on the hose near the front driver's side engine cover mount point. Also, the route in the installation instructions had too many tight curves in which hoses were pressed up against or rubbing other edges. I made some slight changes to the positioning so that there was more slack in the hose and so it pressed up against nothing sharp or "edge-like" at all. I do agree with the zip-tying, though: it doesn't touch that pulley, but it comes damned close if you let it hang loose.

At first glance, it looks like the instructions, but...

These hoses are routed slightly differently which gives them a little more slack and also no hard rubbing on edges. However, you can see one hose still has a mark and indentation where it rubs the lip from the engine cover that goes over the mount pole just to the left of it.

All is not well, though, as the engine cover rubs this other hose and I'll have to figure out what to do about it. You can see the tiny bit of marking as this is still a fresh install. 5000 miles from now and that rub may look very different.
My final verdict? Still a decent product. The price tag is sometimes hard to justify because there is such a thing as a DIY catch can for a fraction of the price, but this kit is a full kit. It's not perfect, and I think some adjustments need to be made, but I'm happy with the final result. I've run it hard a few times, and so far everything is in working order. It looks professional, and is less likely to alarm your dealership than a metal water bottle and some jerry-rigged fittings and poorly thought out hoses. If you want to get a dual catch can setup, this is the one to buy!
Last edited:
